This recipe came to me in an email from AllRecipes.com. I tweaked it a tiny bit. I just love Asian foods. If you know me, know that! Everything from Chinese, Pho, Japanese and Thai! I LOVE IT ALL!! The thing is those aren't the easiest things to make at home. A lot of it seems to be secret. I can never get my Hot and Sour Soup to taste like it does at Mandarin Gourmet. I don't like using those packets or bottles of premade sauce. I mean what's the secret to that?! So when I made this last night and it tasted just like I thought it should I was oh, so happy!! I served mine over white rice and an eggroll on the side. It was so good!
Broccoli Beef
30 Minute Meal 15 Minutes Prep, 15 Minutes Cook Time Serves 4
1/3 cup Oyster Sauce
2 tsp. Sesame Oil
1/3 cup Sherry
1 tsp. Soy Sauce
1 tsp. Sugar
1 tsp. Cornstarch
2 tbls. Sriracha Sauce
8 Dried Chiles, broken into pieces
1 lb. beef round steak, cut into 1/8 inch thick strips, put in medium size bowl.
3 tbls Vegetable Oil
3 thin slices of Fresh Ginger
3 cloves Garlic, peeled and smashed
1 lb. Broccoli, cut into florets
1. Start your rice. Whisk together the oyster sauce, sesame oil, sherry, soy sauce, sugar, cornstarch and sriracha sauce in a bowl. Stir until the sugar has dissolved. Pour the oyster sauce mixture over the meat and coat well. Marinate for at least 30 minutes in the refrigerator.
2. Heat the oil in a wok or large skillet over medium-high heat. Add the ginger and garlic. Let them sizzle in the oil for about 1 minute. Here is a deviation. The recipe said to take the ginger and garlic out. I didn't. Do what you're comfortable with. Stir in the broccoli and stir in the oil until bright green and almost tender, 5-7 minutes. Remove the broccoli from wok and set aside.
3. If you need a little oil, add some. Add the marinated beef until the sauce forms a glaze and the meat is no longer pink, about 5 minutes. Return the broccoli to the wok and stir until well mixed, about 3 minutes.
Wednesday, December 12, 2012
Finger Lickin' Fried Chicken
Fried Chicken is one of my husbands favorites. He asks for it on his birthday and anytime that I ask what to make for Sunday Dinner. This recipe is easy and very flavorful. It might sound a bit weird to make it with hot sauce, especially the quantity, but it's delicious and it is not spicy at all. I repeat, it's not spicy!!! I personally don't like bone or skin with my chicken so I use boneless, skinless chicken breasts and the breading actually stays on!! This is also great to do for chicken tenders!

Finger Lickin' Fried Chicken
30 minutes to Coat 45 minutes to Fry About 8 pieces of chicken
Ingredients
3 cups Self Rising Flour
Salt and Pepper
1 cup Crystal Hot Sauce (or your favorite Louisiana Style Hot Sauce)
2 eggs
Chicken (thighs, drumsticks, breasts - whatever you like)
Peanut Oil
1. In a big bowl add flour and season it heavily with salt and pepper. In a separate bowl, add the eggs and hot sauce and whisk until well mixed.
2. Dry the chicken with a paper towel. The best way to go is to have a "wet" hand and a "dry" hand. Other wise both your hands are caked! I get a station going and move right to left. Coat the chicken well with flour, then coat well with egg/hot sauce mixture, and back to flour mixture. Make sure you coat extremely well. I like to put the chicken on a baking sheet lined with aluminum foil, them I put a coat of flour down for the chicken to soak up. There will be some bits of flour that get wet and stay in the flour bowl, try to get those to stick to the chicken. That is Matt's favorite, he calls them the finger drippings. Also, I like to sprinkle more flour on the chicken on the baking sheet. The chicken will become a tad wet again and will soak it up.
(If you are doing a lot of chicken and run out of flour or egg mixture, you can
just add another cup of flour, or another egg and more hot sauce)
3. For frying the chicken you want your oil HOT!! About 350 degrees. I don't have a pot with the thermometer on it, if you do, use it. I sprinkle some water into the oil and when it starts popping, it is ready to go. You are going to want at least an inch and a half of oil. It should go about half way up you chicken. Place the chicken in the oil with tongs. You want to do this slowly and start with the edge of the piece closest to you, working away from you to avoid splatters.
4. Fry in batches. Overcrowding will reduce the heat of the oil and it will take forever. Drums take about 5 minutes per side per piece. The thighs and breasts will take about 7 minutes per side per piece. I heat the oven to about 170 degrees, place cooling racks in a roasting pan and place my chicken in there to keep warm while I continue with the rest of my batches.
Wednesday, December 5, 2012
Not Your Kids Macaroni and Cheese
Who doesn't love Mac N' Cheese as a kid? But once you get older it's just not the same. You wish it were because how easy it is to make, but no, it's gritty and the second it's not hot it's time for the garbage!! Here is a great recipe for it. It takes a bit longer to make than the box kind but it is so worth it. This dish also is great reheated the next day!
Macaroni and Cheese
40 minute Side Dish 10 minutes prep, 40 minute cook time Serves about 8
1 16 oz. box Elbow Macaroni (get the smaller kind, not large)
8 oz. Velveeta or Other "Cheese Food"
4 oz. Monterey Jack Cheese
4 oz. Muenster Cheese
4 oz. Sharp Cheddar
1 pint Half and Half
1/2 stick butter
1. Preheat oven to 350 degrees. In a large pot, heat water to boil and add pasta. While this is cooking, heat the half and half.
2. While waiting on the above, grate the Monterey Jack, Muenster and Sharp Cheddar. Cut the Velveeta into small pieces.
3. When the cream is hot, slowly add the Velveeta Once it has all melted add the shredded cheeses slowly until well melted in.
4. When the noodles are almost cooked through, remove and add the butter to them mixing well. In a 2.5 quart baking dish add the noodles and then mix the cheese sauce into them. Bake for half an hour.
Thursday, November 29, 2012
Chicken BLT Fettuccine
Everyone loves a BLT! Everyone loves Pasta! My husband isn't a big fan of pasta with red sauce because he gets heart burn. But sometimes a girl just wants some carbs!! I came up with this recipe one night on a whim. I had a ton of fresh basil in my yard along with some fresh tomatoes. I decided to make something up and this is what happened!! I hope you enjoy!!! It's a mix between Chicken Fettuccine and a BLT!! It received the BLT name because of the Prosciutto, Basil and Tomatoes.
Chicken BLT Fettuccine
30 Minute Meal Serves about 6
Ingredients:
1 package Chicken Breasts, cut to bite size pieces
1/2 cup Fresh Basil, minced
1 package Prosciutto, cooked and then crumbled
1 package Cherry Tomatoes, halved
3 tbls Olive Oil
1 tbls. Garlic, minced
1 tsp. Salt & Pepper
1 box fettuccine, cooked to al dente
1 container shaved Parmesan Cheese, reserve some to top with.
1. In a large skillet, cook the prosciutto and remove to a paper towel.
2. In the same large skillet, heat the oil while the fettuccine cooks separately. Add Chicken and Salt and Pepper.
When the chicken just cooked, add the garlic in. Cook for about 1 minute.
3. Add in the crumbled prosciutto, tomatoes and toss together well.
4. At the last minute add in the pasta, basil and Parmesan cheese. When serving top with a bit more cheese and serve.
This is such a tasty dish. And yes there isn't really a sauce except the oil and moisture from the chicken, you don't need it!!! (Not a recent picture but still posting it!!)
Wednesday, November 21, 2012
Carving A Turkey
This is supposed to be the job of The Man of The House but my husband declines year after year because it can be somewhat intimidating. I never did a horrible job, but not a stellar one either. Last year I decided to use a new technique. I take the drum and thigh piece off first then the breast in one whole piece then the wing. This video is great!! I use the "Carving in the Kitchen" technique. It is so much easier than trying to cut nice slices on that huge bird!! This year when I carved the bird, I got rave reviews. Everyone thought I did a great job and gave me compliments. Even my stepdad was impressed saying that he wished he had been taught this way as it looked so much easier and got so much of the bird in such a short amount of time!
Saturday, November 17, 2012
Did Someone Say SOUP!!!
I love soup!! I love everything about it!! I love savory tomato based soups, creamy delicate soups and even a nice homemade chicken soup!! It's just my favorite thing to eat ever!!! My husband on the other hand wouldn't care if he never had to eat soup again. But I got him on this one!! He loves this soup, and so has anyone that I have either served it to or shared the recipe with.
Days like today are the perfect time to make a soup like this one. Paired with a crisp salad you cannot go wrong!!
“To feel safe and warm on a cold wet night, all you really need is soup.”
Laurie Colwin
“There is nothing like soup. It is by nature eccentric: no two are ever alike, unless of course you get your soup in a can.”
Laurie Colwin, 'Home Cooking' (1988)
“Good soup is one of the prime ingredients of good living. For soup can do more to lift the spirits and stimulate the appetite than any other one dish.”
Louis P. De Gouy, ‘The Soup Book’ (1949)
Bacon Cheddar Potato Soup
15 minutes prep 30 cook time Serves about 8 bowls
Ingredients:
1 yellow onion, diced
1/2 cup celery, diced
1 stick butter
5 cups diced peeled potatoes, You can leave the skin, but it's just going to come off when you cook it :(
3 1/2 cups chicken broth
12 oz. sharp cheddar, shredded
1 pint whipping cream
2 cups water
3 oz. package (or fresh) bacon bits, I like the packaged pepper bits!!
4 tbls. flour
1/2 tsp. white pepper
1 tsp. paprika
1 tbls. fresh or dried parsley
1. In a sauce pan, saute onion and celery in 4 oz. of butter, season with salt and pepper. Add potatoes and broth and bring to boil. Reduce heat and simmer for 15 minutes
2. In a skillet, melt the remaining butter, add flour to make a roux. Slowly add water to thin out the mixture.
3. Add roux to the pot along with the cream. Stir well and add the cheese, bacon and spices. Cook over low heat until the cheese is completely melted. Garnish with some of the parsley and serve!

Wednesday, November 14, 2012
Waste Not, Want Not - Keeping Vegetables Fresher Longer
Here are some tips to keeping your produce fresher for longer. If you are anything like me, you hate prepping to make a recipe with ingredients that you just bought and find them, well, lacking. Here are some tips that help me.
1. Keep your fruits and vegetable seperate! Fruits, tomatoes included, produce Ethylene Gas (a natural ripening agent). Vegetables however are very sensitive to ethylene gas making them rot when in contact with these. Fruits tend to do better out of the refrigerator, especially tomatoes.
2. Vegetable are living and breathing. When you put them into the refrigerator you are in a sense putting them into a coma to prolong the life. That's a good thing. When you put your living, breathing vegetables into a plastic bag you are suffocating them. This is a bad thing. I use these exact Reusable Produce Bags. They allow the ethylene gas to escape, prolonging the life of your vegetables/fruits. I have two sets and take them to the grocery store with me, or transfer my produce at home when I forget them. I have increased the life of all my vegetables!! Oh yeah! They are washer friendly too! I do not put them in the dryer but I do wash them and they're great! Brand new again!

3. Vegetable Specifics:
I hope that you find something here that was useful to you. It took me a while to figure all this out on my own.
1. Keep your fruits and vegetable seperate! Fruits, tomatoes included, produce Ethylene Gas (a natural ripening agent). Vegetables however are very sensitive to ethylene gas making them rot when in contact with these. Fruits tend to do better out of the refrigerator, especially tomatoes.
2. Vegetable are living and breathing. When you put them into the refrigerator you are in a sense putting them into a coma to prolong the life. That's a good thing. When you put your living, breathing vegetables into a plastic bag you are suffocating them. This is a bad thing. I use these exact Reusable Produce Bags. They allow the ethylene gas to escape, prolonging the life of your vegetables/fruits. I have two sets and take them to the grocery store with me, or transfer my produce at home when I forget them. I have increased the life of all my vegetables!! Oh yeah! They are washer friendly too! I do not put them in the dryer but I do wash them and they're great! Brand new again!
3. Vegetable Specifics:
- Mushrooms: Remove from store packaging and store these in a paper bag.
- Celery: Remove the store packaging and wrap in tinfoil. This will make your celery last for up to THREE WEEKS!!! Hard to believe but so true, I have been doing it for years. Also, if your celery is limp, cut the bottom of the stem and place in a glass of water overnight. The celery will crisp back up.
- Tomatoes: Place upside down (stem side down) on the counter. This prevents bruising.
- Potatoes, Onions, Squash and Garlic: These are earth grown and should return to the earth. Keep in a dark cool place and remove from the plastic bags, again with the produce bags above. NOT THE REFRIGERATOR! I keep them in a dark cupboard.
I hope that you find something here that was useful to you. It took me a while to figure all this out on my own.
Monday, November 12, 2012
Taco Tuesday with a Twist!!
So tomorrow it Tuesday, Taco Tuesday! Well, it can get a little boring to cook the same ole ground beef/turkey week after week but it's just SO EASY after a long day at work. Well, I have a solution!! Recently Knorr, best known for their soup bases has come out with Rice Sides. I am always interested in trying new, easy ways to spice things up so I tried the Rice Sides. They were alright, but for a cheap ($1.59 for a packet), easy weekday meal they fit just right. Nothing to write home about though.
Well, I was shopping one day and decided to check out other Knorr products. I had steak in my cart already along with other shopping items and I was just checking them out thinking what can I serve with this steak besides salad, a total stand by in our house. I saw that they came out with a Steak Fajitas Rice Sides. Thought, hey that might work. Grabbed it, put it in the cart and come steak night, totally forgot about it!
So anyways, on the back of the bag there is a recipe called "Fajita Chili Con Carne". It basically is ground beef, onion and a few cans of things thrown together. Totally recipe takes about 20 minutes start to finish! This is a great alternate recipe for basic tacos and a great way to use these sides! I did make a few minor changes/additions to the recipe.

This recipe is cheap, easy and there will be leftovers for lunch! Great for you Bachelors!! Also, for camping, this is a great recipe. One pot cooking is the best when camping and this was hot, tasty and easy to do while camping because you don't have to use that much cooler space. Only the meat needs to be refrigerated (I didn't add the cheese or sour cream while camping). We went camping last weekend and I made this one night. I got a fist pump from the boys when they found out that is what we were having! WAY, WAY, WAY better than hamburger helper I might add! That stuff just feels way to fake, like cheese food, blech! (I know some of you will disagree with that and that is fine)
Fajita Chili Con Carne:
20 Minute Meal!! Serves 4-6 Budget Friendly (Approx. $10-12)
Ingredients:
1 package 93% ground beef or lean turkey
1 yellow onion, chopped
3 garlic cloves, diced
1 package Knorr Rice Sides, Steak Fajitas Flavor
1 can diced tomatos, undrained
1 can red kidney beans, rinsed
1 can chicken broth
Cheddar Cheese, Sour Cream and Green Onions to top with
Follow the recipe on the back, it's that simple. In step 1. add garlic at the last minute.
Instead of water I use chicken stock. Other then that, I followed the recipe on the back. Oh and salt and pepper of course!!
Well, I was shopping one day and decided to check out other Knorr products. I had steak in my cart already along with other shopping items and I was just checking them out thinking what can I serve with this steak besides salad, a total stand by in our house. I saw that they came out with a Steak Fajitas Rice Sides. Thought, hey that might work. Grabbed it, put it in the cart and come steak night, totally forgot about it!
So anyways, on the back of the bag there is a recipe called "Fajita Chili Con Carne". It basically is ground beef, onion and a few cans of things thrown together. Totally recipe takes about 20 minutes start to finish! This is a great alternate recipe for basic tacos and a great way to use these sides! I did make a few minor changes/additions to the recipe.
This recipe is cheap, easy and there will be leftovers for lunch! Great for you Bachelors!! Also, for camping, this is a great recipe. One pot cooking is the best when camping and this was hot, tasty and easy to do while camping because you don't have to use that much cooler space. Only the meat needs to be refrigerated (I didn't add the cheese or sour cream while camping). We went camping last weekend and I made this one night. I got a fist pump from the boys when they found out that is what we were having! WAY, WAY, WAY better than hamburger helper I might add! That stuff just feels way to fake, like cheese food, blech! (I know some of you will disagree with that and that is fine)
Fajita Chili Con Carne:
20 Minute Meal!! Serves 4-6 Budget Friendly (Approx. $10-12)
Ingredients:
1 package 93% ground beef or lean turkey
1 yellow onion, chopped
3 garlic cloves, diced
1 package Knorr Rice Sides, Steak Fajitas Flavor
1 can diced tomatos, undrained
1 can red kidney beans, rinsed
1 can chicken broth
Cheddar Cheese, Sour Cream and Green Onions to top with
Follow the recipe on the back, it's that simple. In step 1. add garlic at the last minute.
Instead of water I use chicken stock. Other then that, I followed the recipe on the back. Oh and salt and pepper of course!!
Wednesday, November 7, 2012
Curry Yup Yup with Bust 'Em Up Shut!
This is an odd name for a dish, I know. But this is what Matt and Justin
call it, and it has become my recipes name. Basically it's a Chicken Coconut
Curry. It's a fast, easy recipe that is Oh, So Delicious!! This recipe seems to
be a favorite in my house, not just with Matt
and I but everyone that eats it. I served it at a girls night and, even though
it was SPICY, I got 4 requests for the recipe. Whenever I make this, all of a
sudden I have more and more dinner guests!! Just last Saturday, I made this and
all of a sudden there were 7 for dinner when I only planned on 4!! I think I
cooked this about 5-7 times before I perfected it. And now I don't dare change
a thing!! I might be lynched!!
This recipe is one that I made to be very simple and altered
it so that you don't waste food. It calls for, what I like to call a 1-1-1
ratio. Basically it's one of everything. I mean what are you going to do with
half a can of coconut milk??? So I use the whole can and based the recipe on
that.
If you have a mandolin slicer use it! This is a great recipe
for it. What I do is slice the bell peppers and onions and then slice the rings
in half to give you some nice strips of pepper and onion. You, however, can do
what you like!
Chicken Coconut Curry
Serves 6 30 Minute Meal
10 min. prep, 20 min. cook
Ingredients:
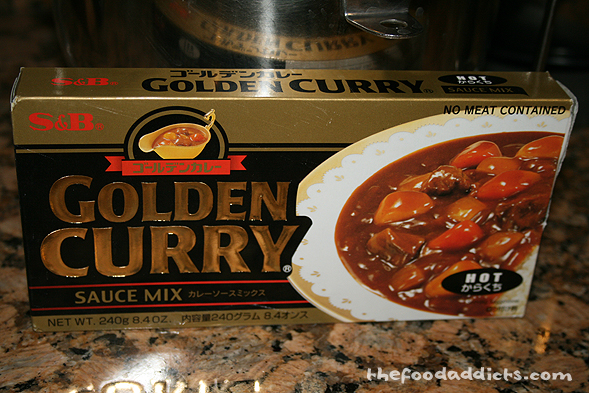
Golden Curry (Found in the International Aisle) Your
preferred hot level. A pic below.
1 package chicken breasts, cut into bite size pieces
2 tbls. vegetable oil or peanut oil (peanut oil is great in
Asian dishes!)
Salt and pepper
1 onion, halved then sliced
1 green bell pepper, halved then sliced
1 red bell pepper, halved then sliced
1 can coconut milk (International Aisle) A pic below of the
brand I use.
1 can bamboo shoots, sliced to match stick size
(International Aisle)
1 cup chicken stock
2 tbls. lime juice
Cilantro, roughly chopped
Any spicy peppers you want, I like it hot so I use two
Serrano Chiles and a Habanero!! Caliente!!
Cooking:
1. Start your rice. It should be done by the time your dish
is. I use 1/2 cups uncooked white rice to have enough for 6 servings.
2. Heat the oil in a large skillet. Add the chicken. Salt
and pepper it. Once the chicken is mostly cooked through add the curry cubes.
There are 5 segments in a box. I use 3 for this recipe. If you would like to
double, just use the whole box. No need to open another. It will work out!
3. Add the coconut milk, lime juice and chicken broth. Mix
until the curry cubes are dissolved. Bring the liquids up to a boil, then lower
to a simmer. This will mix and thicken the sauce.
4. Add the peppers, onions and bamboo shoots and mix well.
When the onions are just translucent and the peppers are firm but cooked your
ready to eat. Serve over rice, top with some cilantro and ENJOY!!
Here's a picture off of Facebook that I took forever ago.
From now on I am going to start using my real camera and try to make the dishes
look pretty before taking the picture. Ha! I don't even have these dishes
anymore. That's how old it is!! Still, gives you an idea of what to expect.


Tuesday, November 6, 2012
Welcome Flavor Fiends!!!
So here we are! I am excited about this new hobby! Cooking to me is home, family and comfort. I love to cook for those I love and am often asked if I could please share a recipe, so I thought, "What a great way to welcome all of you into my kitchen!!"
With this blog I hope to give some people inspiration to cook new interesting things that maybe they thought out of their reach. A place for people that want to cook and don't know how; a forum to ask questions. A place that bachelors will feel welcome to learn some basic skills. People that are watching their weight something DELISH to eat and not go overboard with! I will always cater to the working mom so 30 minute meals are a must!! And Sunday meals with the family have always been a favorite!! I want to, basically, give you a place to find something new and great to share with those close to you!! If you have any suggestions for blog posts, please feel free to let me know. Any contributions will be considered! I am not great with fun Holiday ideas, so those would be cool!
Some of these recipes I will get from the internet/cooking books and make user/eater friendly. Some are straight from my mother. Some are two or three recipes that I have taken from to make what I want. Some are just simple delicious recipes that are fast and easy for a weeknight that I found and think you should know about. (Credit will be given to those who I "bite" off!) I would also like to have a "Monthly Cook-A-Holic" series. So if you have a recipe I would appreciate the entries!!
This is simply me having a good time. If you don't have anything nice to say, you're welcome to "Go on GIT"
Wine is like a woman's breasts:
One is not enough
Two is just right
Three is too many
I love to cook with wine,
Sometimes I even add it to the food.
I will appreciate all the support that I receive about this blog. I am doing this for myself, buy possibly you can benefit from it as well. xoxoxo
This Kitchen Cooks With Love,
Erin Marie
Subscribe to:
Comments (Atom)